Thursday, March 30, 2017

Tutorial 003: 3D Cutting/Carving

Many people purchase CNC machines to create 3d objects and ArtCam can be an excellent software to get people create original and spectacular designs but it is too expensive and requires high level of expertise to create one. But what if you are not an artist and a newbie in cnc machining? Does this means you can no longer do what a highly skilled artist and machinist do? Well in this tutorial, you don't have to be a artist nor a skilled machinist to achieve they can achieve and you can do it the least expensive way.

To get started, the following free software are needed:
  1. TinkerCad. This is a free web based 3D CAD software.
  2. VisualCad with FreeMill plugin installed. This is also a free CAD/CAM software from MecSoft.
  3. GCode Universal Sender Software
The process is so easy, once you have all three software needed, you can begin by creating your favorite 3D Model in TinkerCad and once you are done, you can download your 3D model as STL file.

Next, you open the VisualCAD Software and import your 3d Model stl format. You can watch the following video how to create the gcode:


At the latter part of the video(during the selection of post processor, you should select Carbide 3d GRBL Post Processor since BigCarver Cnc uses the GRBL Universal GCode Sender software.

And that's it!! you are ready to start machining your design with the appropriate endmills.


And here is the resulting 3d carved on mdf:


I remove base of the 3d carved object and here is the final output:


The end mill I used was 4 x 2 x 6 mm spiral 4 flute. I would try other end mills like the 3.175 x 1.5 x 12 mm spiral 2 flute to compare the result. I could not find a local seller so I have to order online and wait for over a week.

Ok, I know it will be really difficult to create spectacular designs in TinkerCad but that doesn't mean you can stop there, I would suggest purchasing pre made stl 3D models at ebay. You can choose from a lot of designs and are very affordable. See example screen grab from ebay:


Wednesday, March 15, 2017

Introducing the Big Carver CNC-5090

I have created a smaller version of the Big Carver CNC-9090 which is the Big Carver CNC-5090. It has the same specs but the x-axis area was reduced in half. This small version is for those people who have limited budget and space but wanted to create stuff just big enough for 500mm x 900mm x 175mm machines.

I also plan to have it enclosed so that dust wont be flying all over the place and with this option, people can do their projects within their garage or even inside their room and most importantly inside their office. Prototyping activities can be more convenient when the tools you need are very accessible.


I will post later the enclosure that I am currently designing for this machine.

Friday, February 24, 2017

X and Z Axis Upgrade

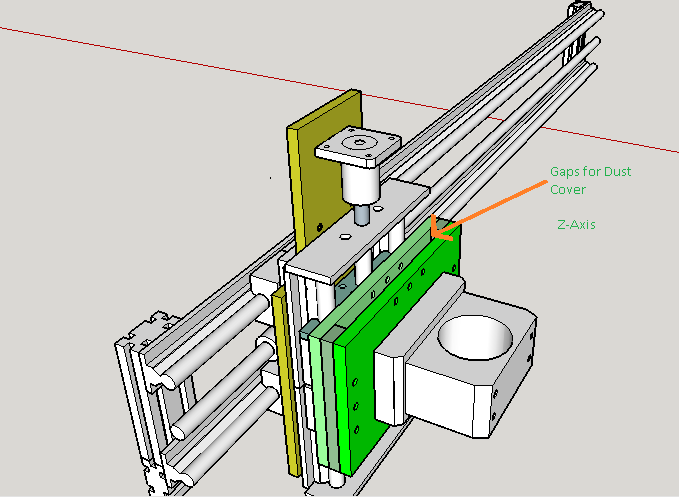
The current design has no provisions for dust covers on the x and z axis, Dust covers are needed because dust easily sticks on the linear rails and this will certainly destroy the machine easily.

So I revised the original design to have provisions for dust cover.


I have added small gaps(9mm) between the mounting plates of the x and z axis:

A good improvement compared to the original design:


Thursday, February 16, 2017

Cnc Carver Upgrade

As noted in my previous posts, while testing the machine, I encountered a lot of problems and through my studies, I have concluded that I need to upgrade the work table from thick mdf and upgrade the motor controller. I will discuss in details in the next paragraphs.


Upgrade the MDF Work Table
During my testing, I found the work table difficult to use and encountered a lot of clamping issues. Mdf once gets wet, it will no longer be usable because it is just a hardened paper, this will be a problem when working with aluminum, because you will need to pour liquid  coolant from time to time to avoid over heating. It could not handle custom sizes and each of the projects I handled was a nightmare. So I decided to upgrade it to t slotted 20 x 40 aluminum profile. I also plan to put transparent acrylic on top to protect the metal surface although acrylic is more expensive than aluminum, but because it's transparent and would just be installed on top of the aluminum, it would be easier to replace. Another use of the acrylic is it will be a support to thin acrylic(<=2mm thick). Thin acrylics tends to bend so they need to be supported and rest on the surface flatly to avoid the bending. The bending while machining will not only destroy the material but the machine as well.


Upgrade the Motor Controller
Again, I have encountered several issues with the motor cotroller which are prone to electric fluctuations and esd, could not supply enough power to the stepper motors even though the rating was 2A max. So finally I decided to upgrade the controller although it still uses the arduino with grbl firmware.  One remarkable improvement is that the machine can run at 1800rpm at 1A ( the controller can supply up 4A but at 2A, the motors and wires gets very hot) while the old grbl controller can only support 750rpm.

It has beed over a month and the whole upgrade was well worth it. The machine no longer stops nor one of the motors stops unpredictably even the electricity fluctuates. Each project I had using this machine brought so much fun experience.

Here is a sample project I made, the CNC Carver's front panel of the enclosure:


Monday, November 28, 2016

Weekend Project: Wooden Cellphone/Tablet Dock

Last weekend, I decided to make a wooden smartphone/tablet dock since I still have a block of pine wood I bought for Php20 at a nearby furniture manufacturing shop. This project is proof that Carver Cnc is an excellent tool for making functional object.

First, I needed to visualize the design and get the actual measurements of the object, I used sketchup to create the initial 3d model!

With the 3d model in mind, I created the gcode in ArtCam. I again used the settings in engraving acrylic to generate the gcode.

Using the universal gcode sender, I began to create the object.

I encountered several untoward incidences while machining, I also made several  miscalculation so I had to stop the machining in between. A major disaster I encountered was the fluctuation of electricity, and destroyed the wood surface at depth of 20mm so I had to stop and smoothen the surface again. After waiting for power to stabilize, I encountered another problem, the power supply of the spindle started to generate rf signals that affects the operation of the grbl shield(a small emp bomb exploded inside my cnc control box), I suspected that this was the effect of the fluctuation from the electrical outlet. Going through the process of resmoothing the surface again is not a good idea anymore so I had to save what has been done, it was a painful process but it worked but leaving several imperfections in the finished product but the imperfections are minimal.


Overall, my weekend project was  success. I learned a lot from this project. The wood block I used was too thick for the cnc to cut the edges that is because the drill bit I used was only about 2.5" long while the wood is about 5".  Maybe I should take it to the furniture shop to have it removed. Sans the errors encountered, the machining process took about 2 hours with setting used, but it can be optimized and it could take 30minutes only because pine wood is a lot softer than acrylic and artcam calculated the cutting depth to be 5mm, at 5mm depth, there is almost no vibration in the machine when the 500W spindle is set at 12000rpm.


Monday, November 21, 2016

Tutorial #002: Wood Machining and Carving

Wood is generally softer than acrylic. While at the office this morning, my mug has no top cover, and I remembered while window shopping, I saw several wooden mug covers and costing above Php480 or almost $10 per piece, and I thought I should make one for my mug.

Here is a sample of what I am referring to:

And here's my mug:

The Artcam I am using is only a trial version so there are no fancy functions included and I had to be content with what the trial version has to offer, that is good  only for 2D machining, but with a little innovative idea and work around, I can still create the mug cover.

I used the same tool profile in tutorial #001,  but I will be using a 6mm straight and single flute router bit. The material I used for the project is a soft pine wood. I could smell the pinewood aroma while machining. 


All I need to draw in Artcam is 2 circles, 1 to carve the inner circle that should fit around the rim of the mug. The small inner circle should be at least 25mm deep at 100mm/sec feed rate  the z-axis. And the outer circle is the cutting edge which is at least 75mm deep. And befor edoing that, I had to smoothen the surface by about 10mm deep.

And here is the result:

Being a newbie in wood machining, this already passed my standards. For experts, this may be a dull project or at least I could made a nice artwork by carving a butterfly at the center and used other bit to smoothen the edges, but for now, this project has been a success story.

Sunday, November 20, 2016

Tutorial #001 : Engraving Acrylic using ArtCam

Machining is not entirely about speed. Most of the time we need to get to know the properties of the material we are using. Engraving acrylic is almost the same as doing the machining process. To engrave the acrylic material, as per my experience, it is not about just the speed and power of the machine. So in this tutorial, I will show how I was able to properly engraved an acrylic material.

First, I needed a nice artwork. I know that Artcam, being a product of Autodesk, is fully compatible with dxf files. And I know that dfx files has been around for decades and a lot of clip arts can be downloaded freely on the internet. My friend google is always there to help, and within a few minutes, I found several free dxf files and I have chosen a butterfly and a complex star pattern.

Upon downloading, I immediately opened the dxf files in ArtCam(I assume that readers have already explored ArtCam and have background in cnc). I then created a 2D toolpath using the following settings:


 Note that I used very low feed rate and plunge rate. These settings are the most suitable using the Carver Cnc.

Now, I have to use this settings in GRBL Software to get the speed I need:

X-axis Feed rate : 625mm/sec
Y-Axis Feed rate: 625mm/sec
Z-Axis Feed rate: Not important but I used 75mm/sec
Spindle Speed: 4000rpm(to save electricity), but  higher rpm is better.

It is also important to note that I used a PCB 1mm diameter drill bit. I have also set Z-Axis depth at -10mm at 75mm/sec feed rate. Since it is just 2d machining, the Z-axis depth is constant.

And I got the following results:


It took less than 5 minutes to process the butterfly pattern while the intricate star pattern was less that 15 minutes.