Monday, November 28, 2016

Weekend Project: Wooden Cellphone/Tablet Dock

Last weekend, I decided to make a wooden smartphone/tablet dock since I still have a block of pine wood I bought for Php20 at a nearby furniture manufacturing shop. This project is proof that Carver Cnc is an excellent tool for making functional object.

First, I needed to visualize the design and get the actual measurements of the object, I used sketchup to create the initial 3d model!

With the 3d model in mind, I created the gcode in ArtCam. I again used the settings in engraving acrylic to generate the gcode.

Using the universal gcode sender, I began to create the object.

I encountered several untoward incidences while machining, I also made several  miscalculation so I had to stop the machining in between. A major disaster I encountered was the fluctuation of electricity, and destroyed the wood surface at depth of 20mm so I had to stop and smoothen the surface again. After waiting for power to stabilize, I encountered another problem, the power supply of the spindle started to generate rf signals that affects the operation of the grbl shield(a small emp bomb exploded inside my cnc control box), I suspected that this was the effect of the fluctuation from the electrical outlet. Going through the process of resmoothing the surface again is not a good idea anymore so I had to save what has been done, it was a painful process but it worked but leaving several imperfections in the finished product but the imperfections are minimal.


Overall, my weekend project was  success. I learned a lot from this project. The wood block I used was too thick for the cnc to cut the edges that is because the drill bit I used was only about 2.5" long while the wood is about 5".  Maybe I should take it to the furniture shop to have it removed. Sans the errors encountered, the machining process took about 2 hours with setting used, but it can be optimized and it could take 30minutes only because pine wood is a lot softer than acrylic and artcam calculated the cutting depth to be 5mm, at 5mm depth, there is almost no vibration in the machine when the 500W spindle is set at 12000rpm.


Monday, November 21, 2016

Tutorial #002: Wood Machining and Carving

Wood is generally softer than acrylic. While at the office this morning, my mug has no top cover, and I remembered while window shopping, I saw several wooden mug covers and costing above Php480 or almost $10 per piece, and I thought I should make one for my mug.

Here is a sample of what I am referring to:

And here's my mug:

The Artcam I am using is only a trial version so there are no fancy functions included and I had to be content with what the trial version has to offer, that is good  only for 2D machining, but with a little innovative idea and work around, I can still create the mug cover.

I used the same tool profile in tutorial #001,  but I will be using a 6mm straight and single flute router bit. The material I used for the project is a soft pine wood. I could smell the pinewood aroma while machining. 


All I need to draw in Artcam is 2 circles, 1 to carve the inner circle that should fit around the rim of the mug. The small inner circle should be at least 25mm deep at 100mm/sec feed rate  the z-axis. And the outer circle is the cutting edge which is at least 75mm deep. And befor edoing that, I had to smoothen the surface by about 10mm deep.

And here is the result:

Being a newbie in wood machining, this already passed my standards. For experts, this may be a dull project or at least I could made a nice artwork by carving a butterfly at the center and used other bit to smoothen the edges, but for now, this project has been a success story.

Sunday, November 20, 2016

Tutorial #001 : Engraving Acrylic using ArtCam

Machining is not entirely about speed. Most of the time we need to get to know the properties of the material we are using. Engraving acrylic is almost the same as doing the machining process. To engrave the acrylic material, as per my experience, it is not about just the speed and power of the machine. So in this tutorial, I will show how I was able to properly engraved an acrylic material.

First, I needed a nice artwork. I know that Artcam, being a product of Autodesk, is fully compatible with dxf files. And I know that dfx files has been around for decades and a lot of clip arts can be downloaded freely on the internet. My friend google is always there to help, and within a few minutes, I found several free dxf files and I have chosen a butterfly and a complex star pattern.

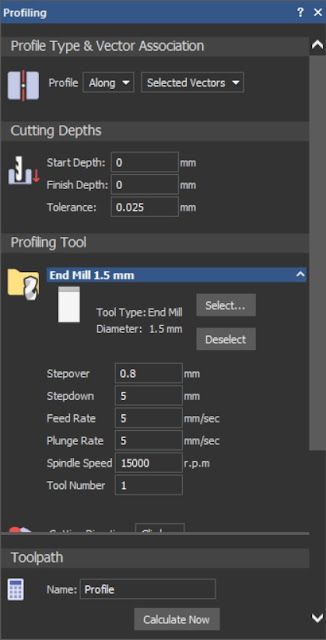
Upon downloading, I immediately opened the dxf files in ArtCam(I assume that readers have already explored ArtCam and have background in cnc). I then created a 2D toolpath using the following settings:


 Note that I used very low feed rate and plunge rate. These settings are the most suitable using the Carver Cnc.

Now, I have to use this settings in GRBL Software to get the speed I need:

X-axis Feed rate : 625mm/sec
Y-Axis Feed rate: 625mm/sec
Z-Axis Feed rate: Not important but I used 75mm/sec
Spindle Speed: 4000rpm(to save electricity), but  higher rpm is better.

It is also important to note that I used a PCB 1mm diameter drill bit. I have also set Z-Axis depth at -10mm at 75mm/sec feed rate. Since it is just 2d machining, the Z-axis depth is constant.

And I got the following results:


It took less than 5 minutes to process the butterfly pattern while the intricate star pattern was less that 15 minutes.

Wednesday, November 16, 2016

Gole 1: 5" Windows PC is Perfect as Cnc Manual Controller

While testing the newly built Cnc Carver, it was really necessary to have a handheld manual control expecially when I am standing and would need to adjust positions of the x,y and z axis, I would have to go back to my pc which is located opposite my location. What happens is I kindda always walk around my lab most of the time which I consider unnecessary when I had a handheld manual controller.

I tried to look for available cnc manual controller but I have not had any success so I thought of other alternatives. The best alternative I could think of is to find a small pc than can be small enough to carry around my lab and will be able to run the GRBL Controller.

At first I considered using the raspberry pi and bought the waveshare 5" hdmi touch screen 1 year ago but I just could not make the touch panel work. Screen is not so bright, I think that screen technolgy is outdated already. I tried the Cherry Alpha Play but it was busted and irepairable and I think Cherry mobile has stopped selling it and not to mention that it has very limited capabilites but way better than the raspberry pi alternative. And finally, I found the gole 1 5" windows 10 pc. I think it is the world's smallest windows 10 pc and the hardware is just perfect for the application I need. It's small, very bright multi-touch ips screen, 4GB Ram, 64GB SSD Hard Disk Drive. It was awesome!!!

I really like the form factor, and now that I have this tiny pc, all I have to do is create a case that will be able to hold in place this pc plus the spindle manual speed controller and a huge e-stop button.

It will be perfect as my weekend project.


Sunday, November 13, 2016

Welcome to Carver Cnc

A brief introduction
Carver Cnc is a large cnc machine. It is designed primarily to become a business machine for pcb making, furniture making, or even as a primary tool in the most advanced maker space. The applications are almost endless.

I created this blog to serve not only as technical documentation but will also contain tutorials and guides on how to properly maintain, handle issues and use the machine properly to avoid failure and ensure longer machine productivity and efficiency.

We all know that cost of these machines are quite expensive so we kind of expect too much from it to do wonders and it will surely does if we know how to create the designs, operate the machine properly.

The machine specifications
Work Area : 30" x 30"  x 8"
.Spindle: 500W with manual speed control(air cooled). 2.2kW is also available
t slotted aluminum base plate
Aluminum and Acrylic frame.
Input Power 220V 60Hz 15A

Software: Grbl Controller/Universal Gcode Sender
G-Code: ArtCam/Fusion 360/FlatCam

Stepper Motors: 4 x Nema 17 2.1A max

Recommended Reading
I highly recommend reading Cnc Cookbook Blog. This blog contains very useful information in handling Cnc Machines perfect for all cnc users(from beginners to the ultimate experts).

I am going to end my post by showing you the very first work I have ever done with this machine:


I used 3mm straight bit single flute 1/4" shank and I used the trial version of ArtCam to generate the g-code.